

Appliqued Pillowshams
These shams fit my regular bed pillows, you can, obviously, make them any size you like, just adjust your measurements accordingly.
1. Cut out (for each sham)
One 18" x 10" middle panel (I used white muslin)
Two 5" x 10" strips of contrasting fabric (this is the fabric you will frame your center
appliqued panel with)
Two 5" x 28" strips of contrasting fabric
Two 20" x 17" pieces of contrasting fabric for an envelope back to the sham
 2. Apply iron on double sided applique adhesive paper to the fabric you will use for the appliques
3. Trace and cut out the appliques

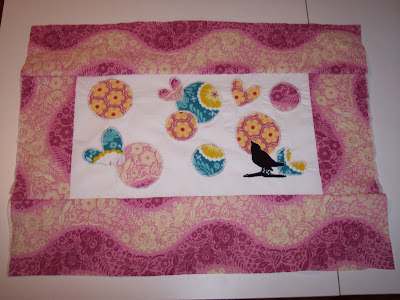
4. Arrange appliques as you like, peel off paper backing and iron onto center panel

5. With zig zag stitch sew all around appliques. Make sure the length of your stitch is very short so your stitches are close together, this is called a satin stitch.

4. Arrange appliques as you like, peel off paper backing and iron onto center panel

5. With zig zag stitch sew all around appliques. Make sure the length of your stitch is very short so your stitches are close together, this is called a satin stitch.
note* if you are layering appliques as I did, sew around the shape that is on the top first, and then on what is left of the outline of the underneath shape.


6. Sew, right sides together, the 5" x 10" onto either side of your middle panel.
Press seams toward the outside.

7. Sew the two 5" x 28" strips onto the top and bottom
Press seams toward th outside.
8. Onto the envelope back - Press a 1/2 inch double hem and sew down on one 20" side of


6. Sew, right sides together, the 5" x 10" onto either side of your middle panel.
Press seams toward the outside.

7. Sew the two 5" x 28" strips onto the top and bottom
Press seams toward th outside.

8. Onto the envelope back - Press a 1/2 inch double hem and sew down on one 20" side of
each back panel.
Lay these panels on top of your front panel, right sides together. The back panels will overlap
Lay these panels on top of your front panel, right sides together. The back panels will overlap
to form the back flap. Trim the back panels to make them the exact size of your front panel.

9. Pin well and sew all around the outside edge. Turn right sides out and you have a new pillowsham!


9. Pin well and sew all around the outside edge. Turn right sides out and you have a new pillowsham!


Wow, you really are very clever indeed!
ReplyDeleteWhat lovely fabric, looks amazing, amazing!
Happy New Year, happy new header too!
Hope you all had a jolly time,
Sarah x