Sunday, January 31, 2010

button it!

I've always avoided buttonholes...preferring snaps so I just wouldn't have to deal. But, there comes a time when you just have to face your fears and plunge in and figure the freaking thing out. Especially since I teach sewing and feel like I need to know this stuff for my students. I mentioned before that my next project was going to be some adorable and very chic sailor pants using a pattern from Danslalune.


I also bought a pattern for a sailor top and dress, to go with the pants...apart from the sailor theme they also have another similarity...lots of buttonholes....the time has come, my friends...time to face my fears and JUST DO IT.

Now, I can make buttonholes manually, but they are so time consuming and don't always look perfectly neat and tidy. So, I got out the buttonhole attachment for my machine, but, since I don't have the manual (always the little details that derail me) I had no idea how it worked. But, through the magic of the interwebnets I found a link to this and I was saved! Enlightened, learned, THRILLED!!!! Because it is so. much. easier. than I ever thought it could be! You just put your button on the buttonholer and it makes the buttonhole the correct length for that particular button! Who knew?!!! Now, I know all of you experienced sewers out there, or sewers who have the good sense to keep their machine manual and can read, probably think I am ridiculous, but I seriously feel like I have made a break through...hooray!


Thursday, January 28, 2010

Happy 2nd Birthday Baby!


red shiny shoes and all!

Wednesday, January 27, 2010

classwork

Every week I marvel at the beautiful items that my sewing students are turning out....coats, dresses and aprons, zippered make up bags, baby shoes and several styles of handbags. Check out this handbag that Kara finished up last night. I developed this pattern for myself because I wanted a big enough bag ( but not toooo big) that had small pockets on the outside to hold my cell phone and could fit a couple of diapers and my wallet and stuff on the inside. I got so many requests for the pattern that I decided to offer it to my students. Kara did my pattern proud :) Gray wool with a midnight blue and plum and black geometric patterned lining....welted pocket on the front and back. Kara has a great eye for choosing fabric combinations...always elegant and lovely...just like her!

p.s. I have one opening for my next series of sewing classes that meet on Tuesday evenings, starting next Tuesday, Feb 2nd. Email me for more info :)

Tuesday, January 26, 2010

spring dreams


i have been meaning to post more often but the days just keep getting away from me. I haven't accomplished much sewing...but I've been planning, for spring. I think this may be the last stretch in which Lily will let me dress her, she hasn't shown a strong opinion yet about her clothes. So I am going to take full advantage! This coat pattern from Oliver + S is definitely on my list. I'm saving up for some Amy Butler Love oilcloth (this stuff is pricey!) and will make a raincoat and probably a hat.


LOVE this little dress pattern ...I am thinking of making it in a, what else?!, Anna Maria Horner Little Folks Voile. There's a book that Lily loves called "Chrysanthamum" by Kevin Henckes and the clothes that he draws for Chrysanthamum are awesome. One of the illustrations is of Chrysanthamum in a pink and orange floral dress with a round yoke just like this...I think I have to make it...Easter dress!
Oliver + S Playdate Dress Pattern


So, while my goal was to be making patterns to have for sale here sometime soon, I'm thinking that particular idea will have to wait for a while. One hour a day of naptime freedom does not a business make. But, I will make a business...all in good time. For now I am enjoying my kids and teaching my classes and dreaming of the things I will sew!

Saturday, January 23, 2010

more Lola love


for Lily's birthday


inexpensive(and I mean SUPER cheap!) plain white tutu and ballet slippers from Target.... some leftover flannel that I fused together with iron on applique adhesive... tacked the butterfly hearts on and done!

hope you all have a relaxing weekend !
xo Jennifer


Tuesday, January 19, 2010

boot cut pants

I have to say, I have been VERY good about using up the fabric from my stash. These pants represent the last of it...yay!!! now I can collect some more :) Maybe, probably, definitely some of the new Anna Maria Horner voile.

For the boot cut pants I used this pattern from the AWESOME Danslalune on Etsy. Check out her adorable pattern for sailor pants while you are there...I know what my next project is going to be!

Cute little pockets...the construction of these pants is so easy but looks sooo professional and jean-like. The jersey waistband is perfect for petite little waists and is so much more comfy than regular jeans...kind of like mini maternity pants ;)

little owl appliques

Tuesday, January 12, 2010

Lola love


Lily loves Charlie and Lola....I love Lola's clothes... and the collage style of Lauren Child, the creator of the books...love.love.love.

So I am making Lily's birthday dress in the "Lola" style...little collar, faux placket front,welted pockets...just have to get the girl to stand still long enough so I can pin the hem....


Sunday, January 10, 2010

and the winner is.....

Faith!!!!

Faith, I will mail your wallet out this week :)

p.s. winner was chosen, at random, from a pot, by the giveaway bunny ;)

Thursday, January 7, 2010

The Circle Wallet Giveaway!

here goes...my first giveaway! It was supposed to coincide with the offering of the wallet pattern for sale. But, as I mentioned before, things are going slowly on that front. And thank you to Amanda, Laura and Nina for your kind and supportive words, you are absolutely right, there's no rush, everything in good time :)

I made quite a few of these wallets for Christmas gifts this year and my sewing students have all been really successful at making them. I have to add in here that I have the most fearless and awesome sewing students. Even the complete novices jumped right in to make these wallets and they surprised themselves (not me, I knew they could do it!) by how well they came out (honestly, it looks way more complicated than it is). The wallet has a zippered change purse on the back and two pockets for bills and two sections for credit cards and such.

So, if you'd like a chance to win this wallet, leave me a comment with your email and I will pick a winner at random on Sunday morning, January 10th at 9 AM Eastern Time. If you mention this on your blog or in a Tweet just let me know and I'll enter you twice!


Thanks and Good Luck!!!

Wednesday, January 6, 2010

Creative Space

....working out this wallet pattern while the little one naps...you know the one?...the pattern that was supposed to be all done and made into a pdf and for sale...yeah, that one...and it's NOT all done, and NOT made into a pdf and DEFINITELY NOT for sale yet....could be a while folks...as I am making incremental progress each day...BUT, on the bright side, I will be posting a giveaway tomorrow...so tune in :)

Monday, January 4, 2010

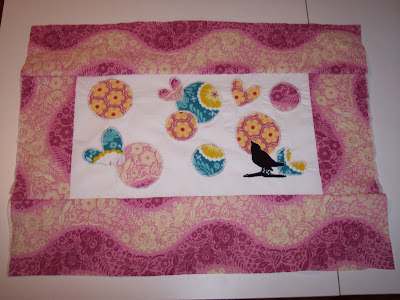
Appliqued Pillowsham Tutorial


Appliqued Pillowshams
These shams fit my regular bed pillows, you can, obviously, make them any size you like, just adjust your measurements accordingly.
1. Cut out (for each sham)
One 18" x 10" middle panel (I used white muslin)
Two 5" x 10" strips of contrasting fabric (this is the fabric you will frame your center
appliqued panel with)
Two 5" x 28" strips of contrasting fabric
Two 20" x 17" pieces of contrasting fabric for an envelope back to the sham

2. Apply iron on double sided applique adhesive paper to the fabric you will use for the appliques
3. Trace and cut out the appliques


4. Arrange appliques as you like, peel off paper backing and iron onto center panel


5. With zig zag stitch sew all around appliques. Make sure the length of your stitch is very short so your stitches are close together, this is called a satin stitch.
note* if you are layering appliques as I did, sew around the shape that is on the top first, and then on what is left of the outline of the underneath shape.


6. Sew, right sides together, the 5" x 10" onto either side of your middle panel.
Press seams toward the outside.


7. Sew the two 5" x 28" strips onto the top and bottom
Press seams toward th outside.


8. Onto the envelope back - Press a 1/2 inch double hem and sew down on one 20" side of
each back panel.
Lay these panels on top of your front panel, right sides together. The back panels will overlap
to form the back flap. Trim the back panels to make them the exact size of your front panel.


9. Pin well and sew all around the outside edge. Turn right sides out and you have a new pillowsham!


Sunday, January 3, 2010

my favorite and my best


....on a snowy Sunday morning

Saturday, January 2, 2010

Folksy Flannel


Love
p.s. Anna Maria Horner Folsy Flannel fabric
p.s.s. Tutorial for the appliqued pillowshams next week :)